How-To: Implement Service Discovery
Context
I'm building a system with microservices architecture. This requires me to have services able to communicate with each other via API. What's the best way to interact with internal API services?
Solution
When building with microservices architecture, it involves having dynamic, autoscaling, and robust services.
When it comes to communication with the API of your services, you need to know the network address of a task instance.
In the traditional approach, the network locations are using static addresses. While it helps you easily to identify the services, you are losing the autoscaling features provided by the cloud services.
When you're building with Copilot and use "Load Balanced Web Service" or "Backend Service" it integrates with Amazon ECS and AWS Fargate. This resulted in having dynamic instances and therefore they are assigned different network locations.
This is when you need service discovery.
There are 2 key components in service discovery, service registry and service discovery.
Service registry holds the list of network locations of services and update them. Service discovery is a mechanism to discover the service instances in order to communicate with the right service. There are two types of service discovery patterns, client-side discovery and server side discovery.
AWS Copilot leverages Amazon ECS Service Discovery to help us discover the network locations of our services. Amazon ECS Service Discovery works by leveraging Amazon Route 53 Service Registry and Auto Naming API.
The image below shows the end result how AWS Copilot configures the service discovery by integrating with Amazon ECS Service Discovery.
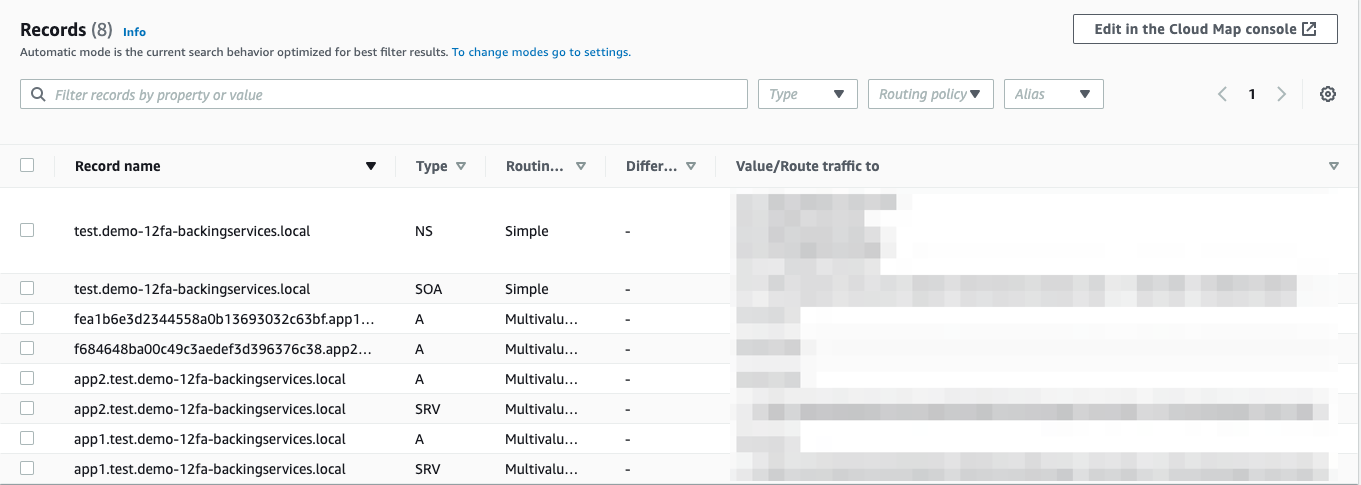
With this feature, your services will be able to communicate within the VPC and the requests are not going to the internet via ALB.
Diagram Architecture
This is the diagram architecture that we’ll build in this tutorial.
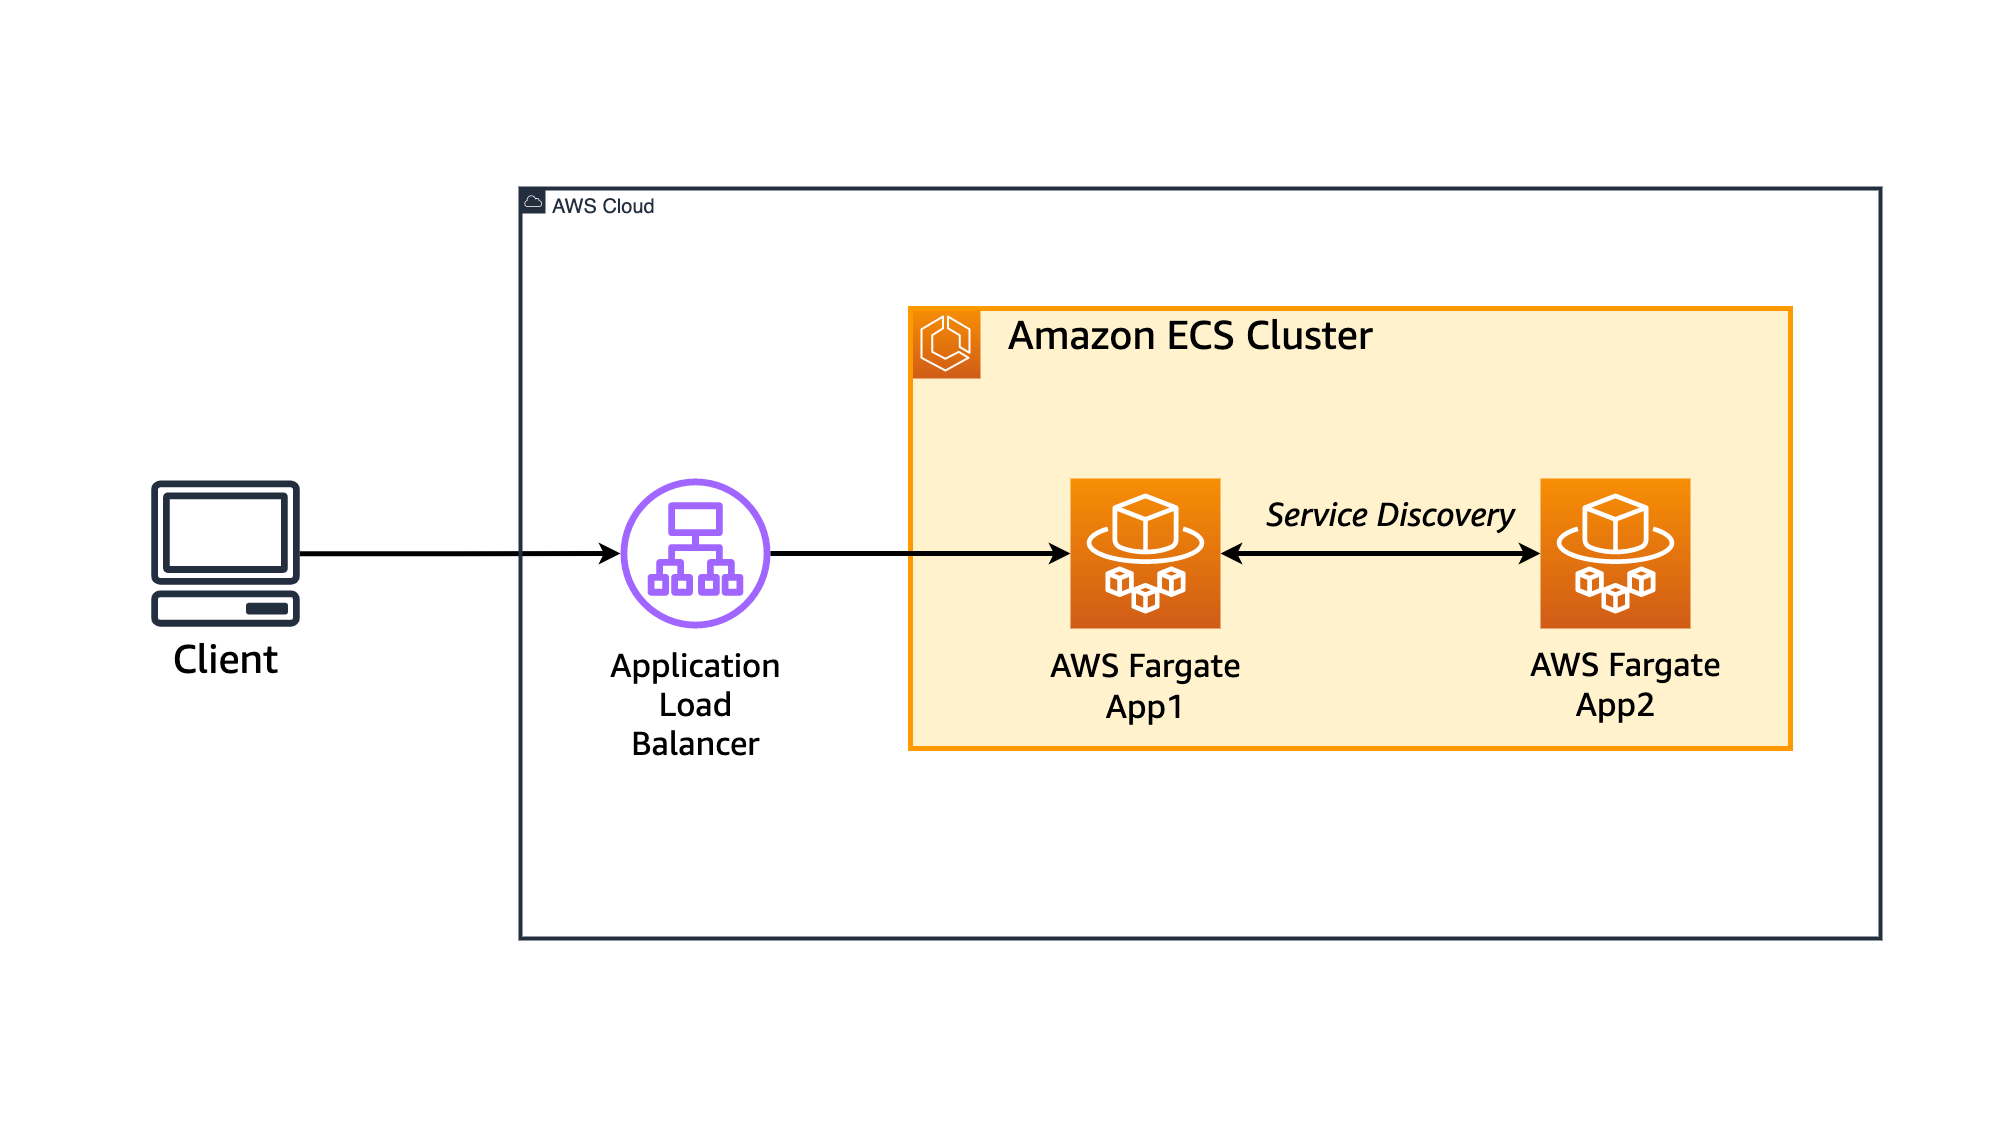
In this tutorial, you’ll learn how to implement Service Discovery pattern.
We have two applications in this tutorial: APP1 and APP2.
APP1 is a public API that when we trigger the endpoint, it will perform HTTP call to APP2 and get the response.
The response from APP2 will be included in APP1 response to client, to show the service discovery works as intended.
Tutorial Preparation
To run this tutorial, please use following information for preparation:
| Activity name | What to input? | Related Tutorial |
|---|---|---|
| Get source code from folder | codes/service-discovery |
/getting-started/10-how-to-use-codes-and-init/ |
| Initialize application | copilot-servicediscovery |
/getting-started/10-how-to-use-codes-and-init/ |
| Create environment | test |
Step-by-step Guide
Step 1: Initialize application
Our first step would be configuring the Copilot application.
Task 1: Run copilot init
When we initialize Copilot application, we need to define the first service that we need to create. In this case, we are going to deploy app2 service. The reason why we deploy app2 before app1 is app1 needs the network location of app2 to implement service discovery.
To initialize the Copilot app, run the following command
copilot init --app copilot-servicediscovery --name app2 --type "Backend Service" --dockerfile app2/Dockerfile
At the end of this activity, you will see similar output as below:
Welcome to the Copilot CLI! We're going to walk you through some questions
to help you get set up with a containerized application on AWS. An application is a collection of
containerized services that operate together.

Ok great, we'll set up a Backend Service named app2 in application copilot-servicediscovery listening on port 9090.

✔ Created the infrastructure to manage services and jobs under application copilot-servicediscovery..

✔ The directory copilot will hold service manifests for application copilot-servicediscovery.

✔ Wrote the manifest for service app2 at copilot/app2/manifest.yml
Your manifest contains configurations like your container size and port (:9090).

✔ Created ECR repositories for service app2..

All right, you're all set for local development.
Deploy: No

No problem, you can deploy your service later:
- Run `copilot env init --name test --profile default --app copilot-servicediscovery` to create your staging environment.
- Run `copilot deploy` to deploy your service.
Copilot will ask if you want to deploy the application into a test environment.
You can choose Yes (Y) and Copilot will automatically configure an environment as well as deploy the app2 for you. If you chose Yes, you can proceed to Step 1: Deploy "app2".
If you choose No, this tutorial will guide you through how you can configure your environment manually. This is recommended for those who are just getting started with Copilot.
In this tutorial, we will guide you to choose "No".
At the end of this stage, you will have a manifest file for app2 service located at copilot/app2/manifest.yml.
Task 2: Create environment
The next thing that we need to do is create the environment called test. In this tutorial, we are using the default configuration to create the environment.
copilot env init --name test --profile default --app copilot-servicediscovery --default-config
You will see a similar output as below:
✔ Linked account XXXXXXXXX and region ap-southeast-1 to application copilot-servicediscovery..

✔ Proposing infrastructure changes for the copilot-servicediscovery-test environment.
- Creating the infrastructure for the copilot-servicediscovery-test environment.  [create complete]  [96.2s]
  - An IAM Role for AWS CloudFormation to manage resources                        [create complete]  [33.0s]
  - An ECS cluster to group your services                                         [create complete]  [8.7s]
  - Enable long ARN formats for the authenticated AWS principal                   [create complete]  [0.0s]
  - An IAM Role to describe resources in your environment                         [create complete]  [29.7s]
  - A security group to allow your containers to talk to each other               [create complete]  [5.6s]
  - An Internet Gateway to connect to the public internet                         [create complete]  [15.3s]
  - Private subnet 1 for resources with no internet access                        [create complete]  [18.6s]
  - Private subnet 2 for resources with no internet access                        [create complete]  [18.8s]
  - Public subnet 1 for resources that can access the internet                    [create complete]  [18.8s]
  - Public subnet 2 for resources that can access the internet                    [create complete]  [18.8s]
  - A Virtual Private Cloud to control networking of your AWS resources           [create complete]  [15.3s]
✔ Created environment test in region ap-southeast-1 under application copilot-servicediscovery.
Step 1: Deploy "app2"
As mentioned previously, we need to deploy app2 since we need the network location of app2 before app1 can perform requests call to app2.
The app2 itself is a Python application running on Flask framework. Whenever it receives a request to / endpoint, it will return the response of "Hello from APP2".
At this stage, we have initialized the Copilot application called copilot-servicediscovery, the app2 service, and the test environment.
We now need to deploy the app2 service.
Code Overview
All source code for app2 service is located in service-discovery/app2 folder. Here's the tree view of the folder:
.
│   ├── Dockerfile
│   ├── app.py
│   └── requirements.txt
Task 2: Deploy "app2" service
We have configured the app2 service, and what we need to do in this step is to deploy the app2 service into the test environment.
To do this, run the following command:
copilot svc deploy --name app2 --env test
You will see similar output as below.
✔ Proposing infrastructure changes for stack copilot-servicediscovery-test-app2
- Creating the infrastructure for stack copilot-servicediscovery-test-app2    [create complete]  [126.8s]
  - Service discovery for your services to communicate within the VPC         [create complete]  [2.5s]
  - Update your environment's shared resources                                [create complete]  [3.4s]
  - An IAM Role for the Fargate agent to make AWS API calls on your behalf    [create complete]  [31.2s]
  - A CloudWatch log group to hold your service logs                          [create complete]  [2.5s]
  - An ECS service to run and maintain your tasks in the environment cluster  [create complete]  [66.0s]
    Deployments
               Revision  Rollout      Desired  Running  Failed  Pending
      PRIMARY  1         [completed]  1        1        0       0
  - An ECS task definition to group your containers and run them on ECS       [create complete]  [4.2s]
  - An IAM role to control permissions for the containers in your tasks       [create complete]  [31.2s]
✔ Deployed service app2.
Recommended follow-up action:
    You can access your service at app2.test.copilot-servicediscovery.local:9090 with service discovery.
Task 3: Get "app2" Network Location
Now we have app2 service deployed. We need to get the network location for app2 before moving on to the next step.
To get the network location of app2 run the following command:
copilot svc show --name app2
This command instructs Copilot to provide details on app2 in all environments.
You will see the similar output as below:
Service Discovery

  Environment       Namespace
  -----------       ---------
  test              app2.test.copilot-servicediscovery.local:9090
Copy the network location in the Service Discovery section.
Step 2: Deploy "app1"
In this step, we are going to deploy app1 as a "Load Balanced Web Service". If we perform a HTTP request call to / endpoint, the app1 will perform a HTTP call to app2 and get the response.
In this step, we will initialize, and configure the app1 service.
Code Overview
All source code for app1 service is located in service-discovery/app1 folder. Here's the tree view of the folder:
.
│   ├── Dockerfile
│   ├── app.py
│   └── requirements.txt
Task 1: Initialize "app1" service
In this step, we are going to initialize the app1 service as "Load Balanced Web Service".
To initialize the sub service, run the following command:
copilot svc init --name app1 --svc-type "Load Balanced Web Service" --dockerfile ./app1/Dockerfile
Once Copilot is done initializing the service, it will create the manifest file located in copilot/sub/manifest.yml.
Task 2: Configure "app1" service
As we have initialized the app1 service in the previous step, what we need to do now is to configure the service. In this step, we need to configure the health check endpoint.
To do this, we will need to modify some properties on the manifest file located at copilot/app1/manifest.yml.
- Open
copilot/app1/manifest.ymlfile. - In the
httpsection, uncomment and modify thehealthcheckproperty to:
healthcheck: /ping
This will define the ALB health check endpoint to /ping that we already defined in our app1 application.
The full configuration for http section will look like this:
http:
  path: '/'
  healthcheck: '/ping'
- Save the manifest file
Task 3: Configure "app1" service
As the app1 needs to call app2, it needs to know the network location of app2 so it could perform HTTP request call.
- Open
./copilot/app1/manifest.yml - Go to the end of the file and add following lines:
environments:
   test:
     variables:
        APP2_URL: <Insert APP2 URL from Step 1:Task 3>
Above lines specify value for an environment variable based on the environment, in this case is test environment.
To better understand how you can use this environment variable to perform HTTP call to app2 from app1, let's review the code.
- Open
app1/app.py
You will see following lines:
APP2_URL = "http://{}".format(os.getenv("APP2_URL"))
Above line defines the variable APP2_URL by formatting with the http:// protocol followed by the app2 network location.
In the main function, you will see how this variable is used to perform HTTP call:
app2_response = json.loads(urllib.request.urlopen(APP2_URL).read())
Task 4: Deploy "sub" service
We have configured the app1 service, and what we need to do in this step is to deploy the app1 service into the test environment.
To do this, run the following command:
copilot svc deploy --name app1 --env test
Step 3: Test Application
Let's review how the application works first before doing the test for our application.
- Send the request to
app1service with endpoint/. - The
app1will perform HTTP call toapp2 - The
app2will get the request and return with a message - The
app1will return the message fromapp2to the client
Task 1: Send request to "app1" service
To send a request to the app1 endpoint, we need to know the URL of the app1 service. To do this, run the following command:
copilot svc show --name app1
In the output, you will see the following details:
Routes

  Environment       URL
  -----------       ---
  test              http://SVC_URL
This is the public URL of the service — that's deployed in test environment — that we can send the request. Copy the value.
To send a request we can use curl command to the / endpoint. To send a request, do the following command:
curl http://SVC_URL/
This will send a request with GET method to / endpoint which will be processed by the app1 service.
The "app1" service will return a similar output:
{
    {"app2_response": "Hello from APP2"}
}
Congrats! If you can see the response as above, you've successfully implemented service discovery and completed this lab.
Step 4: Cleaning up
If you no longer work on this tutorial, you can remove all resources by running following command:
copilot app delete