How-To: Implement Saga Pattern with Copilot
The solution in this tutorial uses AWS Copilot and the AWS CDK. At the time this article was written, AWS Copilot did not yet have integration with the AWS CDK. The solution presented is less than ideal, and is a workaround. Even so, this is a workaround that I think is the cleanest among the approaches. Happy building!
Tl;dr
This tutorial is longer than the other tutorials. For those of you who have experience working with AWS Copilot and AWS CDK, here is a summary of the steps you need to do:
- All the code for the service that must be deployed is in the
saga-pattern/appfolder - All code for state machine with AWS StepFunctions, SSM Parameter Store and IAM role is in
saga-pattern/cdkfolder - To deploy, use the command
copilot svc deploy --name <SERVICE_NAME> --env test - Copy all ECS Task Roles created by Copilot with the command
copilot svc show --name <SERVICE_NAME> --resources - Configure all ECS Task Roles as key-value into
cdk.context.json - Deploy CDK with command
cdk deploy - Perform testing from AWS Step Functions dashboard
- Clean up with
copilot app deleteandcdk destroycommands
Context
One of the challenges in microservices architecture is how we can maintain data consistency. In this tutorial, I'll explain how you can implement the Saga pattern to maintain data consistency. We will build a Saga orchestration using AWS Step Functions and services running on top of AWS Fargate using Amazon ECS, which is deployed using AWS Copilot.
Microservices consist of various services that are independent but related to each other. In other words, a request received by the system will most likely be handled by more than one service and data will be transferred from one service to the related service.
The challenge of maintaining data consistency occurs when a request fails to be fulfilled for some reason by a service. This means, to maintain data consistency, we have to trace to each point where the transaction was processed, and we need to perform a rollback transaction.
Solution
Saga pattern is one solution to handle transactions by managing local transactions that occur in each service. With the Saga pattern, every request handled by the service can be rolled back by compensating transactions.
Compensating transaction in its simplest definition is the ability to undo the effects of activities that have been performed. It should be noted here that compensating transactions must be implemented by every service in the microservices that are part of the Saga, and are generally very service-specific. There are two important characteristics in compensating transactions, namely idempotent and retryable — with the aim of the service being able to handle transactions that have already occurred.
There are two commonly used approaches for implementing the Saga pattern, namely orchestration and choreography. In this tutorial, I will explain how to implement the Saga pattern using orchestration. Orchestration for Saga will be handled by AWS Step Functions, and services handling requests will be handled by AWS Fargate running on Amazon ECS.
Example: Place Order in e-Commerce
As an example, consider the microservices diagram for e-Commerce below. This is an example of a transaction that must be handled when the user places an order for each item that has been added to the shopping cart.

- When the user makes a
Place Order, the request will be received by theInventory Serviceto check whether the selected item is in the warehouse and update it. - If all items are available, the request will then be processed by
Payment Service, to process the payment. - If the payment is successful, the request will then be processed by
Logistic Serviceto prepare the goods and sent to the customer.
Ideally, all requests at any point will be fulfilled successfully by each service. However, what if there is a failure when Logistic Service processes the delivery order? This is a challenge in maintaining data consistency. In other words, to maintain data consistency, every transaction that has been processed by Payment Service and Inventory Service must be rolled back with a compensating transaction approach.
Technical Overview
By using the Saga pattern, we can maintain data consistency for the above case — to be able to overcome process failures that occur at every step in processing transactions.
As mentioned earlier, we'll be using AWS Step Functions to act as the Saga orchestrator in this tutorial. With AWS Step Functions, we can create workflows in a state machine. In the state machine, we can define the steps we need, which are called state. These state can be task, choice, wait, parallel and others which we can combine as needed.
In this tutorial, we will combine several types of state, namely:
taskwith typeactivity— which will be processed by our applicationchoice—± which will help us to determine the flow of statesucceedandfailstate — which to identify the final result of the workflow
Architecture Diagrams
The diagram below provides an overall picture of a the architecture that we will build in this tutorial. The transaction starts when the API receives a request for a Place Order — which usually comes from a website — which will then be handled by the Order Service. Order Service here will trigger the state machine inside AWS Step Functions.
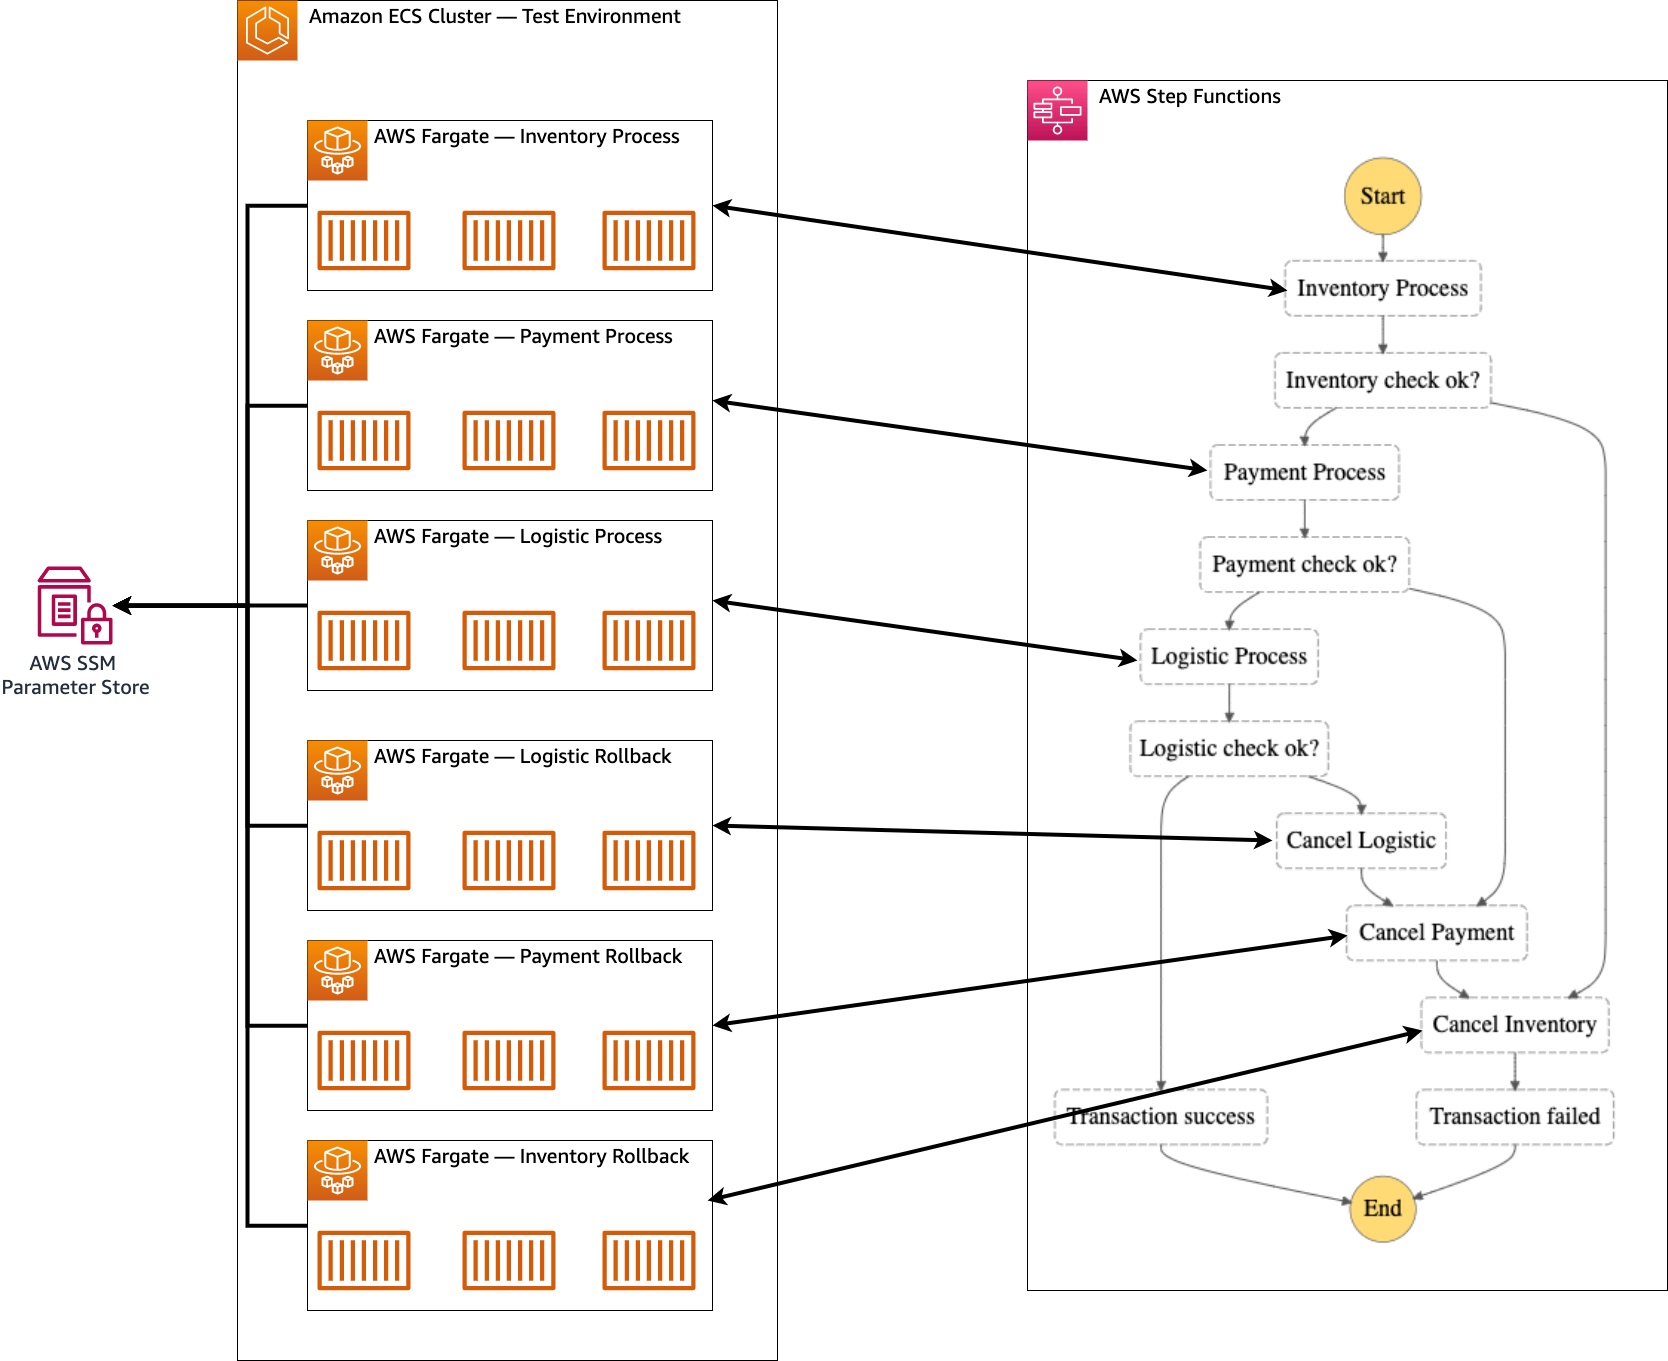
Note: Order Service will not be implemented in this tutorial. You can build an HTTP API by following this tutorial and triggering it using the AWS SDK.
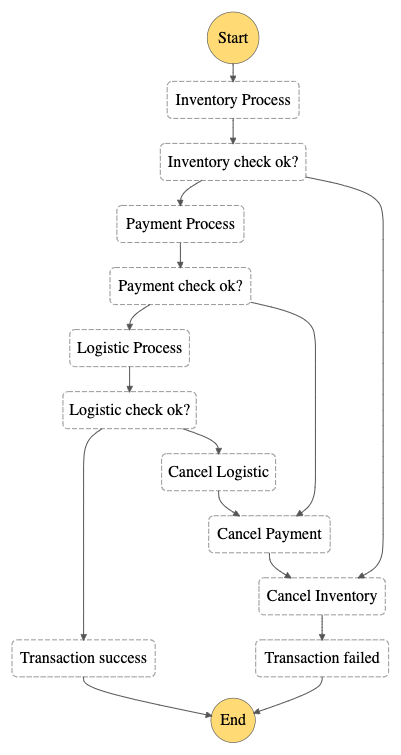
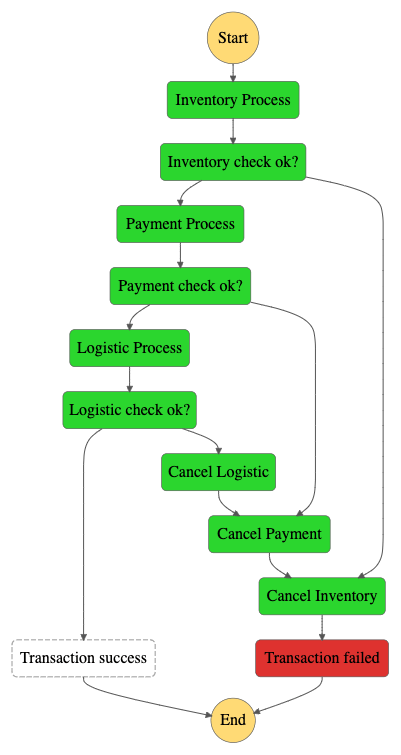
The request will then start the state machine. What will happen in the state machine is that the request will be received first by the Inventory Process and then processed. If the process goes well, the request will be forwarded to the Payment Process. Otherwise, the request will be processed by Cancel Inventory and then transferred to the Transaction Failed state to identify that the Place Order process has failed.
If the request is successfully processed, the request will be forwarded to the Payment Process to ensure the payment can be processed successfully. If the request fails to be processed, the request will be forwarded to Cancel Payment and then to Cancel Inventory and the transaction will be declared Transaction Failed failed.
If the request is successfully processed, the request will be forwarded to the Logistic Process, to ensure the goods can be sent to the buyer's address. If the request fails to be processed, the request will be processed by Cancel Logistic then to Cancel Payment and finally to Cancel Inventory before the transaction is declared Transcation Failed failed.
And if the whole process goes well, then the request will be declared as successful Transaction Success. From here, we can continue the process of sending notifications and even forming invoices to be sent to customers.
Notes
One thing to note here is, in every processing failure, our system needs to have a service that can handle the business logic for compensating transactions. This is important to minimize effect propagation. Each service in this tutorial uses simple business logic, using the probability between True or False.
Preparation tutorials
To run this tutorial, please use the following information for preparation:
| Activity name | What to input? | Related Tutorials |
|---|---|---|
| Get source code from folder | codes/saga-pattern |
/getting-started/10-how-to-use-codes-and-init/ |
| Initialize application | copilot-saga-pattern |
/getting-started/10-how-to-use-codes-and-init/ |
| Create environment | test |
/20-deploy-http-api/#step-3-create-environment |
| Install AWS CDK | N/A | https://docs.aws.amazon.com/cdk/v2/guide/getting_started.html |
| Bootstrap AWS CDK | N/A | https://docs.aws.amazon.com/cdk/v2/guide/bootstrapping.html |
Step-by-step Guide
Don't forget to do the steps mentioned in the "Tutorial Preparation". The steps described below, will skip the copilot init and copilot env and assume that you already have them completed. Therefore, the tutorial will start with deployment services as well as provisioning services with the AWS CDK.
Step 0: Git All Source Codes
In order to follow this tutorial, you will need to clone the source code of the Git repository which you can visit on Github. To be able to clone, you can run the following command:
Using HTTPS
git clone https://github.com/donnieprakoso/copilot.rocks/
Using SSH
git clone git@github.com:donnieprakoso/copilot.rocks.git
Codes — both CDK and Copilot services — are in the codes/saga-pattern subfolder which you'll get when you successfully clone this repo. Here is the structure of the codes/saga-pattern folder — app is the folder that has all the source code for the service, and cdk contains the source code for the AWS CDK:
dev> tree saga-pattern/
saga-pattern/
├── app
│   ├── worker_inventory
│   │   ├── Dockerfile
│   │   ├── app.py
│   │   └── requirements.txt
│   ├── worker_inventory_rollback
│   │   ├── Dockerfile
│   │   ├── app.py
│   │   └── requirements.txt
│   ├── worker_logistic
│   │   ├── Dockerfile
│   │   ├── app.py
│   │   └── requirements.txt
│   ├── worker_logistic_rollback
│   │   ├── Dockerfile
│   │   ├── app.py
│   │   └── requirements.txt
│   ├── worker_payment
│   │   ├── Dockerfile
│   │   ├── app.py
│   │   └── requirements.txt
│   └── worker_payment_rollback
│       ├── Dockerfile
│       ├── app.py
│       └── requirements.txt
└── cdk
    ├── app.py
    ├── cdk.context.json
    ├── cdk.json
    └── requirements.txt
Notes
One note for the CDK, this tutorial assumes that you have at least worked with the AWS CDK. Codes for CDK are already available in the cdk folder. If you have never worked with AWS CDK, you will need to follow the setup instructions provided in the "Tutorial Preparation" section.
Step 1: Deploy Services
As explained in the "Architecture Diagram" section, we will deploy 6 services with the service type "Worker Service" using AWS Copilot. This is because by using the state type Activity we can get the state from Step Functions using a polling approach. There are 6 services that we will deploy, namely:
Payment ProcessPayment RollbackInventory ProcessInventory RollbackLogistic ProcessLogistics Rollback
Code Overview
Before we move on to deployment for all services, it's a good idea to take the time to do a code review first. If you look at the folder structure in saga-pattern/ you can see that all services have something in common — namely Process and Rollback. Since almost all code also has the same characteristics, we will examine only 2 examples, namely Inventory Process and Inventory Rollback.
Code Review: Inventory Process
This process will poll the activity — which occurs in the state machine — to get its data. For the complete code, you can see it directly at this link. This section will describe only some of the most important.
To be able to connect with AWS Step Functions, we need Activity ARN. Usually, you can use ARNs directly from AWS StepFunctions, but since this time we will be integrating between AWS Copilot and AWS CDK, the implementation will be a bit complex.
In the following snippet, you can see that Activity ARN is fetched from the SSM Parameter Store. This SSM Parameter Store is created by the AWS CDK, and all Activity ARNs are placed in SSM. This will be explained further in the CDK section, and for now you just need to know that all Activity ARNs are loaded from SSM.
_ssm = boto3.client('ssm')
activity_arns = json.loads(_ssm.get_parameter(
    Name='copilot-saga-pattern-activity-arns')["Parameter"]["Value"])
SFN_ACTIVITY_ARN = activity_arns['inventory-process']
We move on to the next part, which is the main function. Here you see that we are doing a loop. After we get the activity task from Step Functions, we will process the request by calling the process() function.
if __name__ == '__main__':
    sfn_client = boto3.client('stepfunctions', region_name=AWS_REGION)
    while True:
        response = sfn_client.get_activity_task(
            activityArn=SFN_ACTIVITY_ARN,
            workerName='worker-inventory'
        )
        try:
            print(response)
            if response["taskToken"]:
                input_payload = json.loads(response["input"])
                # if input_payload["inventory_state"] == "process":
                logger.info("Received input - {}".format(input_payload))
                # process() is just a dummy function to process the transaction
                if process():
Function process() itself is a simple function — by doing randomization — and return high chance probability of True, which indicates local transaction is processed successfully.
def process():
    # Randomize with high chance it will succeed.
    return True if random.random() > 0.1 else False
After that, the flow process will run with 2 conditions. The return of process() is True or False. Both outputs will update 2 properties, namely inventory_state and inventory_result. For the inventory_result property, this will be used in checking in the state machine. If True it will be forwarded to Payment Process, if False which indicates the process failed, it will be forwarded to Cancel Inventory. In practice, you can use different logic.
if process():
    # Simulate if the process() successfully processed the transaction
    input_payload["inventory_state"] = "done"
    input_payload["inventory_result"] = True
else:
    # Simulate if the process() failed processing the transaction
    input_payload["inventory_state"] = "done"
    input_payload["inventory_result"] = False
After all processes are complete, the service will update the Step Function that the task has been successfully executed by calling the send_task_success() function along with its output which will be the input for the next process.
# Send the response back to SFN
sfn_client.send_task_success(
    taskToken=response["taskToken"],
    output=json.dumps(input_payload)
)
Code Review: Inventory Rollback
For service rollback, our service will be simpler in this tutorial. Whereas in practice, the complexity will be based on the business logic you need to implement. As in the service process, we will get the Step Functions Activity ARN via the SSM Parameter Store.
_ssm = boto3.client('ssm')
activity_arns = json.loads(_ssm.get_parameter(
    Name='copilot-saga-pattern-activity-arns')["Parameter"]["Value"])
SFN_ACTIVITY_ARN = activity_arns['inventory-rollback']
After that, the service will get input from the previous process, and update the inventory_rollback and inventory_result payloads. These two properties will have no effect in the state machine, because it is only to implement a sample of compensating transaction to undo the previous process.
input_payload = json.loads(response["input"])
logger.info("Received input - {}".format(input_payload))
# Update the payload
input_payload["inventory_rollback"] = "done"
input_payload["inventory_result"] = False
After all processes are complete, the service will update the Step Function that the task has been successfully executed by calling the send_task_success() function along with its output which will be the input for the next process.
# Send the response back to SFN
sfn_client.send_task_success(
    taskToken=response["taskToken"],
    output=json.dumps(input_payload)
)
In all services, if an error occurs during processing, it will call send_task_failure() to Step Functions to indicate an error has occurred in the process.
except Exception as e:
    logger.error(traceback.print_exc())
    sfn_client.send_task_failure(
        taskToken=response["taskToken"], error="Problem on processing", cause="Inventory-Rollback")
At this point, you should get an understanding of how each service works. In practice, the implementation for compensating transactions will be more complex because it requires integration with the database and implementation of business logic. From this sample code, at least you already know how the whole service works, and where you need to make modifications according to your needs.
Let's move on to the next step, namely deployment for services.
Services Deployment Overview
In this step, we will deploy for 6 services. All of the commands to use copilot deploy into a test environment, and the only difference is the name of the service — such as worker-inventory, worker-payment etc — and the Dockerfile that will be used for each service. You can find the Dockerfile along with the source code for each service in the subfolders.
Deploy Inventory Process
Task 1: Initialize service
To deploy Inventory Process, you can perform below steps:
cd app
copilot svc init --name worker-inventory --svc-type "Worker Service" --dockerfile worker-inventory/Dockerfile
Task 2: Deploy service
After the service has been initialized successfully, then we can deploy the service. To deploy a service, we can do the following:
copilot svc deploy --name worker-inventory --env test
The above command will deploy the Inventory Process service to the test environment.
Deploy Inventory Rollback
Task 1: Initialize service
To deploy Inventory Rollback, you can perform below steps:
cd app
copilot svc init --name worker-inventory-rollback --svc-type "Worker Service" --dockerfile worker-inventory-rollback/Dockerfile
Task 2: Deploy service
After the service has been initialized successfully, then we can deploy the service. To deploy a service, we can do the following:
copilot svc deploy --name worker-inventory-rollback --env test
The above command will deploy the Inventory Rollback service to the test environment.
Deploy Payment Process
To deploy Payment Process, you can perform below steps:
Task 1: Initialize service
cd app
copilot svc init --name worker-payment --svc-type "Worker Service" --dockerfile worker-payment/Dockerfile
Task 2: Deploy service
After the service has been initialized successfully, then we can deploy the service. To deploy a service, we can do the following:
copilot svc deploy --name worker-payment --env test
The above command will deploy the Payment Process service to the test environment.
Deploy Payment Rollback
To deploy Payment Rollback, you can perform below steps:
Task 1: Initialize service
cd app
copilot svc init --name worker-payment-rollback --svc-type "Worker Service" --dockerfile worker-payment-rollback/Dockerfile
Task 2: Deploy service
After the service has been initialized successfully, then we can deploy the service. To deploy a service, we can do the following:
copilot svc deploy --name worker-payment-rollback --env test
The above command will deploy the Payment Rollback service to the test environment.
Deploy Logistic Process
To deploy Logistic Process, you can perform below steps:
Task 1: Initialize service
cd app
copilot svc init --name worker-logistic --svc-type "Worker Service" --dockerfile worker-logistic/Dockerfile
Task 2: Deploy service
After the service has been initialized successfully, then we can deploy the service. To deploy a service, we can do the following:
copilot svc deploy --name worker-logistic --env test
The above command will deploy the Logistic Process service to the test environment.
Deploy Logistics Rollback
To deploy Logistic Rollback, you can perform below steps:
Task 1: Initialize service
cd app
copilot svc init --name worker-logistic-rollback --svc-type "Worker Service" --dockerfile worker-logistic-rollback/Dockerfile
Task 2: Deploy service
After the service has been initialized successfully, then we can deploy the service. To deploy a service, we can do the following:
copilot svc deploy --name worker-logistic-rollback --env test
The above command will deploy the Logistic Rollback service to the test environment.
Step 2: Integrate IAM Roles into AWS CDK
In this section, we need to get all the ECS Task Roles created by AWS Copilot for each service. The goal we want to achieve in this step is that all our services need to get sufficient permissions to call the SSM Parameter Store and also AWS Step Functions. The challenge is that because ECS Task Roles (created by AWS Copilot) and AWS StepFunctions and SSM Parameter Store (created by AWS CDK) they are all created by different tools.
This section is where I feel this is a workaround step, because at the time of writing, there was no official integration between AWS Copilot and the AWS CDK yet. Of the many options we have for integration, this is a workaround that is less complex and requires minimal manual steps. If you have other options, please file the PR, and we can have a discussion to improve this step.
What we are going to do in this step is get the ECS Task Roles first. To import it into our CDK app, it will be explained in the following steps.
Get All ECS Task Roles
Here you need to get the ARN Task Role for each service by running the command:
copilot svc show --name <SERVICE_NAME> --resources
Which will output the following:
Resources

  test
    Custom::EnvControllerFunction envcontoller/saga-pattern-test/worker-inventory
    AWS::Lambda::Function saga-pattern-test-worker-inv-EnvControllerFunction-XXXXXXXXXXXX
    AWS::IAM::Role saga-pattern-test-worker-invento-EnvControllerRole-XXXXXXXXXXXX
    AWS::KMS::Key XXXXXXXXXXXX-XXXXXXXXXXXX-XXXXXXXXXXXX-XXXXXXXXXXXX-XXXXXXXXXXXX
    AWS::SQS::Queue https://sqs.ap-southeast-1.amazonaws.com/XXXXXXXXXXXX/saga-pattern-test-worker-inventory-EventsQueue-XGsw8zEvskQX
    AWS::IAM::Role saga-pattern-test-worker-inventory-ExecutionRole-XXXXXXXXXXXX
    AWS::Logs::LogGroup /copilot/saga-pattern-test-worker-inventory
    AWS::SQS::QueuePolicy saga-pattern-test-worker-inventory-QueuePolicy-XXXXXXXXXXXX
    AWS::ECS::Service arn:aws:ecs:ap-southeast-1:XXXXXXXXXXXX:service/saga-pattern-test-Cluster-XXXXXXXXXXXX/saga-pattern-test-worker-inventory-Service-XXXXXXXXXXXX
    AWS::ECS::TaskDefinition arn:aws:ecs:ap-southeast-1:XXXXXXXXXXXX:task-definition/saga-pattern-test-worker-inventory:7
    AWS::IAM::Role saga-pattern-test-worker-inventory-TaskRole-XXXXXXXXXXXX
At the bottom you see we get the ARN of the Task Role which is saga-pattern-test-worker-inventory-TaskRole-XXXXXXXXXXXX. you need records one by one of the RN outputs of each service.
Here's the command you can use to get this output:
For worker-inventory
copilot svc show --name worker-inventory --resources
For worker-inventory-rollback
copilot svc show --name worker-inventory --resources
For worker-payment
copilot svc show --name worker-payment --resources
For worker-payment-rollback
copilot svc show --name worker-payment-rollback --resources
For worker-logistic
copilot svc show --name worker-logistic --resources
For worker-logistic-rollback
copilot svc show --name worker-logistic-rollback --resources
Step 3: Deploy Another Resources using AWS CDK
In this step, we will deploy state machines with AWS Step Functions, AWS SSM Parameter Store and IAM roles. Before we deploy, what we need to do first is to continue importing the ECS Task Roles that we got from the following step into the AWS CDK. To import, we can use the Context feature in the AWS CDK so we need to configure the cdk.context.json file.
Configure cdk.context.json
Once you've got all the ECS Task Roles for each service, all we need to do now is add the appropriate IAM permissions, so that each ECS Task Roles has access to the AWS Step Functions as well as the SSM Parameter Store. One way we can do this is to import the ECS Task Roles into the CDK app, and add them from the CDK app.
Context — as quoted from AWS CDK documentation — are key-value pairs that can be associated with an app, stack, or construct. With Context, we can also add custom context values to be used in our CDK app or app constructs.
Therefore, the first step we need to do is to import all ECS Task Roles as context and place all ECS Task Roles into cdk.context.json.
Here is the file from codes/saga-pattern/cdk/cdk.context.json that you can use as a reference for you:
{
  "aws-cdk:enableDiffNoFail": "true",
  "acknowledged-issue-numbers": [19179],
  "list_ecs_task_roles": {
    "worker_inventory": "saga-pattern-test-worker-inventory-TaskRole-XXXXXXXXXXXX",
    "worker_inventory_rollback": "saga-pattern-test-worker-inventory-rollba-TaskRole-XXXXXXXXXXXX",
    "worker_payment": "saga-pattern-test-worker-payment-TaskRole-XXXXXXXXXXXX",
    "worker_payment_rollback": "saga-pattern-test-worker-payment-rollback-TaskRole-XXXXXXXXXXXX",
    "worker_logistic": "saga-pattern-test-worker-logistic-TaskRole-XXXXXXXXXXXX",
    "worker_logistic_rollback": "saga-pattern-test-worker-logistic-rollbac-TaskRole-XXXXXXXXXXXX"
  }
}
In this app, the context for ECS Task Roles is defined in the list_ecs_task_roles property which is a key-value. All you need to do in this step is change the ARN value— for example saga-pattern-test-worker-inventory-TaskRole-XXXXXXXXXXXX to your own Task Role ARN.
Code Review: CDK
Once you have configured for cdk.context.json, you have everything you need to deploy your application. Before that, let's review our CDK app first so you understand the flow created by this app.
You can find the code for this app's CDK codes/saga-pattern/cdk/app.py.
Defining Activity
The first thing we need to do here is build a state machine with AWS Step Functions, as well as define the required flows — as described in the "Diagram Architecture" section.
Therefore, we need to define 6 activity:
inventory_process = _sfn.Activity(self, "Inventory-Process")
inventory_rollback = _sfn.Activity(self, "Inventory-Rollback")
payment_process = _sfn.Activity(self, "Payment-Process")
payment_rollback = _sfn.Activity(self, "Payment-Rollback")
logistic_process = _sfn.Activity(self, "Logistic-Process")
logistic_rollback = _sfn.Activity(self, "Logistic-Rollback")

activity_inventory_process = _sfn_tasks.StepFunctionsInvokeActivity(self, "Inventory Process",
                                                                    activity=inventory_process
                                                                    )
activity_inventory_rollback = _sfn_tasks.StepFunctionsInvokeActivity(self, "Cancel Inventory",
                                                                     activity=inventory_rollback
                                                                     )
activity_payment_process = _sfn_tasks.StepFunctionsInvokeActivity(self, "Payment Process",
                                                                  activity=payment_process)
activity_payment_rollback = _sfn_tasks.StepFunctionsInvokeActivity(self, "Cancel Payment",
                                                                   activity=payment_rollback
                                                                   )
activity_logistic_process = _sfn_tasks.StepFunctionsInvokeActivity(self, "Logistic Process",
                                                                   activity=logistic_process
                                                                   )
activity_logistic_rollback = _sfn_tasks.StepFunctionsInvokeActivity(self, "Cancel Logistic",
                                                                    activity=logistic_rollback
                                                                    )
Succeed and Failed State
After that, we also need to define the state so that we can identify which transactions failed, and which succeeded:
state_succeed = _sfn.Succeed(self, "Transaction success")
state_failed = _sfn.Fail(self, "Transaction failed")
Defining Flow with Choice
After that we need to define a choice to check whether activity_inventory_process was successful or not. If the transaction is successful, it will be forwarded to activity_payment_process and if not it will be processed by activity_inventory_rollback. Since activity_inventory_rollback also signifies the end of the process chain, the next state is state_failed.
c_inventory_check = _sfn.Choice(self, "Inventory check ok?")
c_inventory_check.when(_sfn.Condition.boolean_equals(
    "$.inventory_result", True), activity_payment_process)
c_inventory_check.when(_sfn.Condition.boolean_equals(
    "$.inventory_result", False), activity_inventory_rollback)

activity_inventory_rollback.next(state_failed)
After that we need to define a choice to check whether activity_inventory_process was successful or not. If the transaction is successful, it will be forwarded to activity_logistic_process and if not it will be processed by activity_payment_rollback then activity_inventory_rollback before the transaction is declared failed.
c_payment_check = _sfn.Choice(self, "Payment check ok?")
c_payment_check.when(_sfn.Condition.boolean_equals(
    "$.payment_result", True), activity_logistic_process)
c_payment_check.when(_sfn.Condition.boolean_equals(
    "$.payment_result", False), activity_payment_rollback)

activity_payment_process.next(c_payment_check)
activity_payment_rollback.next(activity_inventory_rollback)
And finally is to define a sequential process for logistics. Here we define choice to check whether activity_payment_process is successful or not. If the transaction is successful, then the transaction is declared successful and forwarded to state_succeed and if not it will be processed by activity_logistic_rollback, which will then be processed sequentially by activity_payment_rollback then activity_inventory_rollback before failing.
c_logistic_check = _sfn.Choice(self, "Logistic check ok?")
c_logistic_check.when(_sfn.Condition.boolean_equals(
    "$.logistic_result", True), state_succeed)
c_logistic_check.when(_sfn.Condition.boolean_equals(
    "$.logistic_result", False), activity_logistic_rollback)

activity_logistic_process.next(c_logistic_check)
activity_logistic_rollback.next(activity_payment_rollback)
Since we've got all the states and flows we need, all we need to do is define the machine definition state, and mark activity_inventory_process as the initial state.
definition = activity_inventory_process.next(c_inventory_check)
        _sfn.StateMachine(
            self,
            "copilot-saga-pattern",
            definition=definition,
            timeout=core.Duration.minutes(5))
At this point you already understand how state machines are created. Since this tutorial heavily uses state machines using AWS Step Functions, it's a good idea to read the documentation from AWS Step Functions to get thorough understanding of how the state element is used in this tutorial.
Storing Activity ARNs in AWS SSM Parameter Store
Each service in this app requires the ARN of each activity in AWS Step Functions. To facilitate retrieval for each ARN activity, we will need an SSM Parameter Store to centralize all ARNs. The service will then perform a retrieval based on the key defined here, such as inventory-process, inventory-rollback, etc.
activity_arns = {
    "inventory-process": inventory_process.activity_arn,
    "inventory-rollback": inventory_rollback.activity_arn,
    "payment-process": payment_processs.activity_arn,
    "payment-rollback": payment_rollback.activity_arn,
    "logistic-process": logistic_process.activity_arn,
    "logistic-rollback": logistic_rollback.activity_arn,
}

ssm_activity_arns = _ssm.StringParameter(self, "{}-activity-arns".format(stack_prefix),
                                         description='List of activities ARNs for Workers',
                                         parameter_name="{}-activity-arns".format(
    stack_prefix),
    string_value=json.dumps(activity_arns)
)
Extended IAM Permissions for ECS Task Roles
Now, what we need to define are additional IAM permissions for each ECS Task Roles. Each of our services needs access to the AWS Step Functions as well as the SSM Parameter store. For access to AWS Step Functions, we will implement the least privilege approach — which means we only define the permissions that are needed, no less and no more.
For the record, this is the workaround described earlier so we can integrate between AWS Copilot and AWS CDK.
# This part is a bit complicated.
task_roles = self.node.try_get_context("list_ecs_task_roles")
for key in task_roles:
    iam_for_worker = _iam.Role.from_role_arn(self, "{}-worker-taskrole-{}".format(
        stack_prefix, key), role_arn="arn:aws:iam::{}:role/{}".format(core.Aws.ACCOUNT_ID, task_roles[key]))

    sfn_policy_statement = _iam.PolicyStatement(
        effect=_iam.Effect.ALLOW)
    sfn_policy_statement.add_actions("states:GetActivityTask")
    sfn_policy_statement.add_actions("states:SendTaskSuccess")
    sfn_policy_statement.add_actions("states:SendTaskFailure")
    sfn_policy_statement.add_actions("states:DescribeActivity")
    sfn_policy_statement.add_actions("states:SendTaskHeartbeat")
After that, we will assign policy statements to each service based on the role of each service. For example, worker_inventory can only access activities for inventory_process and cannot access other activities.
if key == "worker_inventory":
    sfn_policy_statement.add_resources(
        inventory_process.activity_arn)
elif key == "worker_inventory_rollback":
    sfn_policy_statement.add_resources(
        inventory_rollback.activity_arn)
elif key == "worker_payment":
    sfn_policy_statement.add_resources(
        payment_process.activity_arn)
elif key == "worker_payment_rollback":
    sfn_policy_statement.add_resources(
        payment_rollback.activity_arn)
elif key == "worker_logistic":
    sfn_policy_statement.add_resources(
        logistic_process.activity_arn)
elif key == "worker_logistic_rollback":
    sfn_policy_statement.add_resources(
        logistic_rollback.activity_arn)
iam_for_worker.add_to_principal_policy(sfn_policy_statement)
After that, we will grant read permission for our service to the SSM parameter store.
ssm_activity_arns.grant_read(iam_for_worker)
Finally we define our app and name it as copilot-saga-pattern.
stack_prefix = 'copilot-saga-pattern'
app = core.App()
stack = CdkStack(app, stack_prefix, stack_prefix=stack_prefix)
core.Tags.of(stack).add('Name', stack_prefix)

app.synth()
Deploy CDK App
After that, you can deploy by running the following command. Don't forget to make sure cdk.context.json is properly configured.
cdk deploy
Once the process is complete, you can see all the resources created by the AWS CDK, including the state machine that you can access in the AWS Step Functions dashboard.
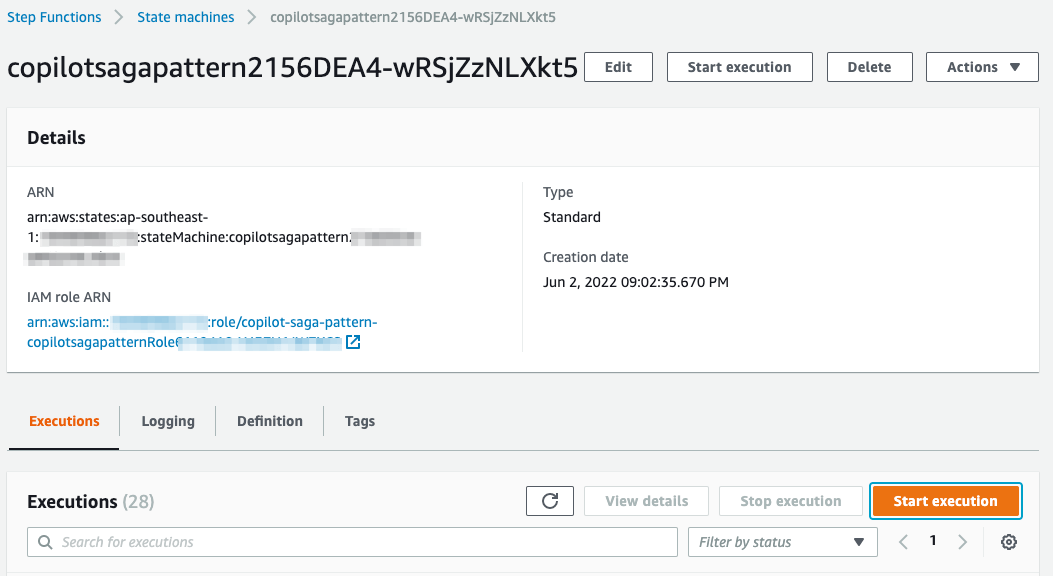
Step 4: Testing
To test, all you need to do is open your state machine in the AWS Step Functions dashboard. Then click the Start Execution button:
Then, you can enter an empty JSON input:
{}
After that your state machine will run like the following screenshot if all local transaction processed successfully:
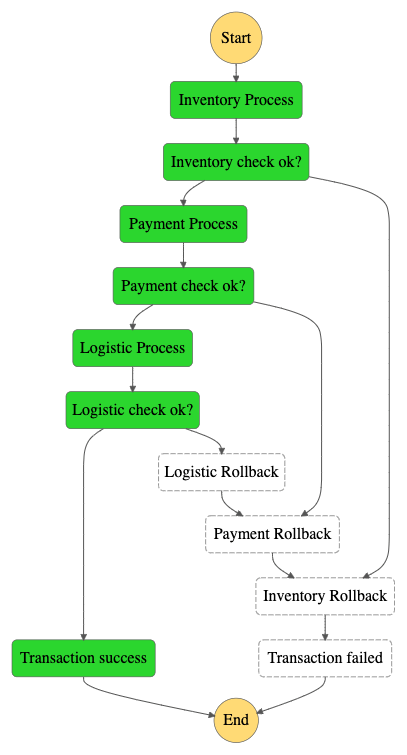
And in case if the Logistic Process fails, then it will undo the previous local transactions as follows:
Because each process will be random, then you may encounter various scenarios, such as all 1) successful transactions, 2) Inventory Process transactions fail and will continue to Cancel Inventory, even 3) all transactions are successful but fail in Logistic Process so it is necessary to rollback to all previous processes.
Step 5: Cleaning Up
If you no longer work on this tutorial, you can remove all resources by running the following command:
cd app/
copilot app delete
Then for CDK
cd cd/
cdk destroy
Happy building! 🤘🏻
-D